
SM7 UV DLP Projector User’s Guide
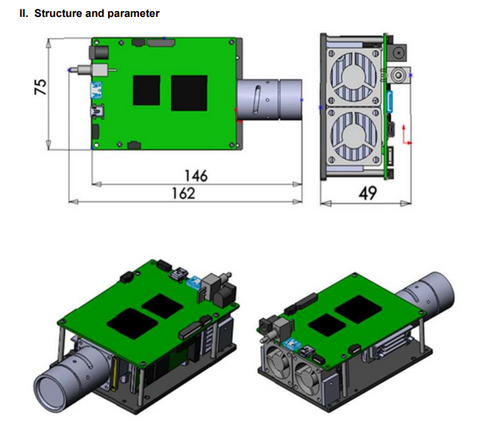
I. Overview SM7-405A UV DLP projector is a compact light engine module which can be applied to the fields of industry, medicine, biology and science. The core adopts TI DLP display and drive technology, and the display unit uses 0.45 inch DMD with the resolution of WXGA 1280×800. The UV DLP projector uses full-metal shell and all-glass material. The symmetric design of the projection lens is especially suitable for binocular structured light. It supports multi-wavelength LED light source and various of projection lenses, and it is convenient to replace. The projector can support synchronous input and output, store raster images directly, set up projection time of each image, and correspondingly output synchronous trigger model in order to meet the needs of customers in different environments. The projector supplies portable, programmable and compact light engine module for customers, and it is especially for the 3D raster scanner with high-end requirements.
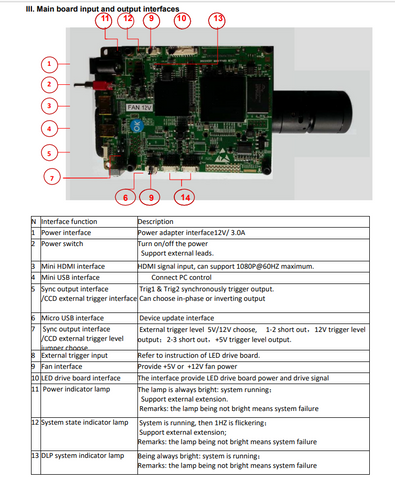
1. Power interface:(J1) Power adapter specification:ACIN:100-240V,OUT:DC12V / 3A Connection mode can refer to (VI) customized connecting instruction of power adapter Interface definition Pin # Name Type Description 1 GND Output GND 2 VIN+ Output VIN+
2. Power switch:(SW1) OFF ON As shown in figure: Pin # Name Type Description 1 UP Upwards, power off 2 DOWN Downwards, power on
3. Main board power indicator lamp:(LED1,LED2,LED3
4. HDMI/VGA composite interface:(CN6) Mini HDMI can access HDMI 1.4 substandard video signal input ,and support 1080P@60HZ maximum。
5. USB 2.0 interface(CN7) USB 2.0 uses Micro USB interface. When U disk insert it,it need Micro USB OTG date line to connect,then realize USB data reading and system upgrade.
6. Mini USB interface:(CN14) When standard mini USB to PC data line is inserted into PC, it can switch the function of the software perform device with the PC upper machine, eg, LED lamp switch on/off, LED temperature monitoring, input signal source (HDMI / VGA)switching, system upgrading, etc
7. Sync signal output interface:(CN16) It can be used to connect CCD camera triggering External sync signal interface is reserved two roads on the interface board, which are used to synchronize with outside device. Meanwhile, the main board sets up two drive levels to be chosen, +5V or +12V. 1# Interface definition: Pin # Name Type Description 1 GND power GND 2 Triger1 Output Sync output1 3 GND power GND 4 Triger2 Output Sync output2
8. Sync signal output level select jumper:(CN23,CN24)
9. Fan interface:(CN10) Fan interface of mainboard is supplied for 5V power fan 1# Interface definition Pin # Name Type Description 1 GND Output GND 2 FAN_V+ Output Connect positive of fan power(+5V)
10. LED drive board power interface:(CN2) Main board provides power supply to LED drive board, meanwhile, provide LED drive signal and other signals.
IX. Simple trouble removal NO Troubles Trouble removal
1 Shutdown,no indicator lamp is bright, LED is not bright Checking: If power adapter is connected normally. If it is caused by power adapter failure. If the power switch is on.
2 Starting up, power indicator lamp is bright, DLP indicator lamp is not bright or system state indicator lamp is not bright Checking: If the connection between main board and engine module is flexible. If the problem is solved after removing the main board. If yes, it means the connection between main board and light engine module is loose, please fix again.
3 Light engine LED is not bright, no image Checking: If the power connection line between LED drive board and main board is loose If the power connection line between LED and LED drive board is loose. If the system starts LED protection function because of the higher temperature of LED If the problems above solved after restarting up. If not, it means the hardware is damaged.
4 No image Checking If the connection between main board and light engine module is loose or poor contact. Please fix again.
5 Image shaking Checking: If the connection between main board and light engine module is loose or poor contact. Please fix again.